Java
object reference not set to an instance of an object ! getting this error, lets discuss this in detailed manner
In programming, encountering errors is a common occurrence. However, understanding and rectifying these errors is what makes a proficient programmer. One such common error that developers often run into is the “object reference not set to an instance of an object.”
This error is a tell-tale sign of a Null Reference Exceptionand is encountered when an object that is expected to have a value actually has a value of null. It’s essential to grasp the concept behind this error to debug and rectify it effectively.
Key Takeaways:
- Understanding the error and its occurrence.
- Grasping the concept of object references in programming.
- Identifying common scenarios causing this error.
- Debugging tools and practices to resolve this error.
Understanding Object References in Programming
Object references are fundamental concepts in programming, especially in Object-Oriented Programming (OOP). They act as an access point to the memory location where the object data resides.
Explanation of Object References
- Object references are variables that hold the memory address of objects.
- They are used to interact with the object they point to.
- A null reference means that the variable doesn’t point to any object.
Here’s a simple example to understand object references:
String str; // declaration of object reference
str = new String("Hello"); // instantiation of object
In this example, str is an object reference that points to a new instance of the String object.
Memory Management of Object References
- The JVM (Java Virtual Machine) manages the memory allocation and deallocation for objects.
- Garbage Collection (GC) helps in reclaiming the memory that is no longer in use.
This table shows the lifecycle of an object reference in Java:
| Stage |
Description |
| Creation |
Object reference is created and points to an object. |
| Usage |
Object is accessed and used through the object reference. |
| Null Assignment |
Object reference is assigned a null value. |
| Garbage Collection |
Object’s memory is reclaimed by the Garbage Collector. |
Common Scenarios Causing the Error
Understanding the common scenarios that lead to the “object reference not set to an instance of an object” error can help in preventing and debugging this error effectively.
Null Reference Scenarios
A null reference scenario arises when an object reference is declared but not instantiated or is assigned a null value.
String str = null;
System.out.println(str.length()); // Throws NullReferenceException
In this example, str is a null reference, and attempting to access a method on it causes the error.
Incorrect Object Instantiation
Incorrect or partial instantiation of objects can also lead to this error.
String[] strArray = new String[5]; // Array of 5 string references, all null initially
System.out.println(strArray[0].length()); // Throws NullReferenceException
Here, the array strArray is instantiated, but the individual string references within it are null.
Accessing Members of a Null Object
Accessing members (methods or properties) of a null object is a common cause of this error.
String str = null;
System.out.println(str.length()); // Throws NullReferenceException
How to Identify and Debug the Error
Debugging is crucial to identify the root cause of the “object reference not set to an instance of an object” error and to rectify it.
Using Debugging Tools
Most IDEs provide debugging tools that can help identify the line of code causing the error.
- Breakpoints: Setting breakpoints allows for inspecting the flow of the program and the state of object references.
- Watch windows: Watch windows enable real-time tracking of variable values.
Analyzing Stack Trace
The stack trace provides a detailed log of the program execution path, helping to pinpoint the location and cause of the error.
Code Review Practices
Adopting good code review practices can help prevent this error.
- Code walkthroughs and peer reviews to identify potential null reference scenarios.
- Utilizing static code analysis tools to identify unsafe code patterns.
Solutions to Resolve the Error
Understanding the error is the first step towards resolving it. However, implementing the right solutions is crucial to prevent this error from reoccurring.
Proper Object Instantiation
Ensuring objects are properly instantiated before use is crucial.
- Avoid declaring object references without instantiation.
- Use constructors to ensure objects are in a valid state upon creation.
String str = new String("Hello"); // Proper instantiation
Null Checks Before Accessing Object Members
Incorporating null checks can prevent attempts to access members of null objects.
- Use conditional statements to check for null before accessing object members.
- Utilize libraries or language features that provide safe access to object members.
if (str != null) {
    System.out.println(str.length()); // Safe access
}
Using Null-Conditional Operators
Some programming languages offer null-conditional operators to safely access members of potentially null objects.
- C# provides the
?. operator to safely access members of null objects.
- Kotlin offers the
?. and ?: operators for safe access and providing default values.
string str = null;
int? length = str?.Length; // length will be null, not a NullReferenceException
Best Practices to Avoid the Error
Adopting certain best practices can help prevent the “object reference not set to an instance of an object” error.
Safe Coding Practices
- Encapsulation: Ensuring that object state is accessed and modified in a controlled manner.
- Validation: Validating object state before use.
Utilizing Optionals or Nullable Types
- Languages like Java and C# offer Optionals or nullable types to represent potentially absent values.
- Utilizing these types can prevent null reference errors.
Optional optionalStr = Optional.ofNullable(null);
optionalStr.ifPresent(System.out::println); // No action if value is null
Code Analysis Tools
Frequently Asked Questions (FAQs)
Why does this error commonly occur?
The error commonly occurs due to a lack of understanding of object references and null values in programming. Ensuring proper object instantiation and null checks can prevent this error.
How can I prevent this error in my code?
- Proper object instantiation.
- Performing null checks before accessing object members.
- Utilizing language features like null-conditional operators or Optionals.
What tools can help identify potential null reference errors?
Is this error specific to any programming language?
No, this error is common across many programming languages, although the exact error message may vary.
How do I handle null values to prevent this error?
- Use null-conditional operators or Optionals/Nullable types.
- Always perform null checks before accessing object members.
Java
Java is a versatile programming language that offers a variety of data structures to store, manage, and manipulate data. Among these, Java List is a crucial data structure that’s widely utilized due to its dynamic nature and ability to hold an ordered collection of elements. Sorting is a fundamental operation that organizes elements into a specific order, enhancing the efficiency and accessibility of data.
Key Takeaways:
- Understanding of Java List and its functionalities.
- Different methods to sort a List in Java.
- Practical examples demonstrating list sorting.
- Comparison of various sorting methods.
Understanding Java List
A Java List is an ordered collection, also known as a sequence, where the user has precise control over where in the list each element is inserted. Unlike sets, lists typically allow duplicate elements, making them a flexible choice for many programming scenarios.
Features of Java List:
- Ordered Collection: The elements in a list are ordered in a specific sequence.
- Index Access: Elements can be accessed by their integer index.
- Duplicate Elements: Lists typically allow the presence of duplicate elements.
- Various Implementations: Such as ArrayList, LinkedList, etc.
Methods to Sort a List in Java
Sorting is essential for efficiently accessing and managing data. In Java, various methods can be used to sort a list.
Using Collections.sort() Method
The Collections.sort() method is a straightforward and effective way to sort lists in Java. By default, it sorts the list in ascending order:
Collections.sort(list);
Here’s a practical example of sorting a list of integers using the Collections.sort() method:
import java.util.*;

public class Main {
    public static void main(String[] args) {
        List numbers = Arrays.asList(3, 1, 4, 1, 5, 9);
        Collections.sort(numbers);
        System.out.println(numbers);  // Output: [1, 1, 3, 4, 5, 9]
    }
}
Other Sorting Methods
Apart from the Collections.sort() method, several other methods can aid in sorting a list in Java:
stream.sorted() methodComparator.reverseOrder() methodComparator.naturalOrder() methodCollections.reverseOrder() method
Each of these methods has its use cases and can be chosen based on the requirement.
Practical Examples
Practical examples are crucial for understanding the application of sorting methods in real-world scenarios.
// Example demonstrating the use of Comparator.reverseOrder() method
Collections.sort(list, Comparator.reverseOrder());
Comparison of Sorting Methods
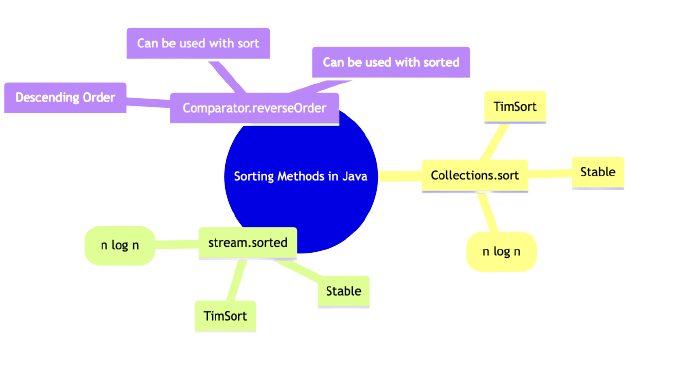
Comparing different sorting methods helps in understanding the advantages and disadvantages of each, aiding in making an informed decision based on the use case.
| Method |
Time Complexity |
Space Complexity |
Stability |
Collections.sort() |
O(n log n) |
O(n) |
Yes |
stream.sorted() |
O(n log n) |
O(n) |
Yes |
Comparator.reverseOrder() |
O(n log n) |
O(1) |
No |
Advanced Sorting Techniques
www.tracedynamics.com
Java provides advanced sorting techniques that cater to more complex sorting requirements, especially when dealing with objects in a list.
Sorting Objects in a List
Sorting objects in a list requires a bit more setup compared to sorting primitive types or wrapper classes. Typically, the objects’ class would need to implement the Comparable interface, or a Comparator would need to be provided.
// Sorting a list of objects using Comparable
Collections.sort(list);

// Sorting a list of objects using Comparator
Collections.sort(list, new CustomComparator());
Sorting Using Custom Comparators
Custom comparators provide a way to define your own sorting logic, allowing for a high degree of customization:
// Defining a custom comparator
class CustomComparator implements Comparator {
    public int compare(MyObject o1, MyObject o2) {
        return o1.customField - o2.customField;
    }
}

// Using the custom comparator to sort a list
Collections.sort(list, new CustomComparator());
External Libraries for Sorting
While Java provides robust sorting capabilities, external libraries can offer additional features or improved performance.
- Apache Commons Collections: Provides a plethora of sorting and other collection-related utilities.
- Google Guava: Offers ordering functionality which is a powerful, yet flexible abstraction for sorting.
For further exploration, you may refer to TraceDynamics which provides more insights into sorting ArrayList in Java.
Frequently Asked Questions
- What is the difference between
Collections.sort() and Arrays.sort()?
Collections.sort() is designed for sorting elements of Collections, while Arrays.sort() is for sorting arrays.
- How can I reverse the order of elements while sorting?
- Use
Collections.reverseOrder() or a custom comparator.
- What are the time complexities of different sorting methods in Java?
- Most sorting methods have a time complexity of O(n log n), although the exact time complexity can vary based on the method and the input data.
- Can I create a custom sorting order in Java?
- Yes, by creating a custom comparator.
- Are there external libraries that can help with sorting in Java?
- Yes, libraries such as Apache Commons Collections and Google Guava provide additional sorting utilities.
Java
In the realm of programming, the debate between Kotlin and Java has been a hot topic among developers, especially with Google’s endorsement of Kotlin as the preferred language for Android development. This article delves deep into the nuances of both languages, aiming to offer a well-rounded perspective to both seasoned and budding developers.
Key Takeaways:
- Understanding the core differences in syntax and ease of use between Kotlin and Java.
- Insight into the performance and efficiency of both languages.
- The community support and libraries available for Kotlin and Java.
- Real-world use cases and industry adoption of Kotlin and Java.
- Frequently asked questions to address common queries regarding Kotlin and Java.
History and Development
Origin and Evolution
Java, being one of the cornerstone languages of modern programming, has had a long-standing history since its inception in 1995. On the other hand, Kotlin, a new entrant, was introduced by JetBrains in 2011, aiming to address some of the challenges faced by Java developers.
| Aspect |
Java |
Kotlin |
| Year of Introduction |
1995 |
2011 |
| Developer |
Sun Microsystems |
JetBrains |
| Initial Purpose |
Write Once, Run Anywhere (WORA) |
Address Java’s limitations, Improve coding efficiency and productivity |
Syntax and Ease of Use
Java’s verbose syntax often requires developers to write more code to accomplish the same tasks, whereas Kotlin’s concise syntax leads to less code, which is easier to read and write.
Code Conciseness and Readability
- Java: Requires explicit type declarations.
- Kotlin: Supports type inference, which leads to more concise code.
Example of a simple “Hello, World!” program in both languages illustrates the syntax difference:
// Java
public class HelloWorld {
  public static void main(String[] args) {
    System.out.println("Hello, World!");
  }
}
// Kotlin
fun main() {
  println("Hello, World!")
}
Performance and Efficiency
In most cases, the performance of Kotlin and Java is comparable as both compile to bytecode that runs on the JVM. However, Kotlin has a slight edge in some scenarios due to its modern design features.
Compilation and Runtime Performance
Both Kotlin and Java exhibit strong performance characteristics, yet subtle differences exist. Kotlin's inline functions and smart casts often lead to a performance boost, making it a slightly more efficient choice in certain scenarios.
| Performance Metric |
Java |
Kotlin |
| Compilation Time |
Generally faster |
Slightly slower due to additional features |
| Runtime Performance |
Established performance |
Comparable with slight edges in certain scenarios |
Tool Support
Both Kotlin and Java have robust tool support, yet Kotlin has an advantage with its seamless integration with IntelliJ IDEA, a popular IDE among developers.
| Tool |
Java Support |
Kotlin Support |
| Integrated Development Environments (IDEs) |
Eclipse, NetBeans, IntelliJ IDEA |
IntelliJ IDEA, Android Studio |
| Build Tools |
Maven, Gradle, Ant |
Gradle, Maven |
Build Tools and Other Supportive Tools
The build tools and other supportive tools play a crucial role in enhancing the developer experience. Kotlin's seamless integration with existing Java tools is a testament to its modern design principles.
- Gradle: Kotlin's support for DSL in Gradle files makes build script writing more intuitive.
- Maven: Both languages have strong support for Maven, a widely used build automation tool.
Community and Support
The vibrant community and extensive libraries are among Java’s strong suits. Kotlin, although newer, has a growing community and is receiving substantial support from JetBrains and Google.
- Java: Established community with a vast array of libraries and frameworks.
- Kotlin: Growing community, with support from major industry players like Google and JetBrains.
Learning Resources and Forums
A strong community backs both languages, providing a wealth of learning resources and forums for developers at all levels.
- Java: A plethora of resources available due to its long-standing history.
- Kotlin: Growing number of tutorials, forums, and community-driven content.
Null Safety and Exception Handling
Null safety is a standout feature in Kotlin, reducing the chances of null pointer exceptions, a common runtime error in Java.
| Feature |
Java |
Kotlin |
| Null Safety |
No built-in null safety features |
Null safety built into the type system |
| Checked Exceptions |
Requires catch or throw declaration |
No checked exceptions, leading to less boilerplate code |
Functional Programming Support
Functional programming concepts are more naturally integrated in Kotlin, whereas Java has incorporated functional programming features in the recent versions.
- Higher-Order Functions and Lambdas: More straightforward implementation in Kotlin compared to Java.
Libraries and Frameworks
Both languages have a rich set of libraries and frameworks, albeit Java has a longer history, hence a more extensive collection.
Web Development Frameworks
The plethora of frameworks available for both Kotlin and Java facilitate a broad spectrum of web development projects.
- Spring Framework: A comprehensive framework that is popular in both Java and Kotlin ecosystems for building web applications.
Use Cases
Java Use Cases
- Legacy Codebases: Maintenance of legacy codebases is a common use case for Java.
- Web Development: With frameworks like Spring and Hibernate, Java has been a popular choice for web development.
Kotlin Use Cases
- Android Development: Kotlin's conciseness and null-safety features make it a preferred choice for Android development.
- Backend Development: Kotlin’s frameworks like Ktor are gaining traction in backend development.
Data Science and Machine Learning
With the advent of libraries and frameworks supporting data science and machine learning, both languages are venturing into this domain.
- Java: Renowned libraries like Deeplearning4j.
- Kotlin: Emergence of Kotlin for Data Science initiative by JetBrains.
Industry Adoption
Industry giants like Google, Pinterest, and Basecamp have embraced Kotlin for various projects, whereas Java continues to dominate in enterprise-level applications and backend development.
Enterprise-Level Applications
The maturity and stability of Java make it a preferred choice for enterprise-level applications, while Kotlin's modern syntax and features are attracting newer projects.
| Industry |
Java |
Kotlin |
| Finance |
Widely used |
Gaining traction |
| Healthcare |
Established use |
Emerging use |
Future Prospects
The ongoing support from JetBrains and Google, along with the growing community, suggest a bright future for Kotlin. Java, with its entrenched position and vast ecosystem, will continue to be a pivotal language in the tech industry.
As we continue exploring the dynamics between Kotlin and Java, we aim to provide a deeper understanding that caters to developers at all levels. The journey from understanding syntax to industry adoption provides a holistic view of what each language brings to the table.
Language Evolution and Community Growth
The continuous evolution of both languages and the growth of their respective communities indicate a bright future and ongoing relevance in the tech industry.
- Java: Continuous updates through JEPs (Java Enhancement Proposals).
- Kotlin: Regular updates and new features being introduced by JetBrains.
Frequently Asked Questions (FAQs)
Is Kotlin going to replace Java?
While Kotlin offers some modern features and concise syntax, it's not likely to replace Java entirely due to Java's entrenched position in the industry.
Can Kotlin and Java code coexist in a project?
Yes, Kotlin is designed to be interoperable with Java, allowing developers to have both Kotlin and Java code within the same project.
Is Kotlin difficult to learn?
Kotlin is often considered to be more straightforward to learn for those who already have a background in Java.
Which is better for Android development, Kotlin or Java?
Kotlin is often preferred for new Android projects due to its conciseness and modern language features.
What are the performance differences between Kotlin and Java?
The performance is often comparable, although Kotlin might have slight advantages in some scenarios due to its modern design features.
Java
For Loops are a fundamental concept in MATLAB, aiding in executing a block of code for a specified number of iterations. They are indispensable for automating repetitive tasks and performing operations over arrays or matrices. This guide aims to provide an in-depth understanding of For Loops in MATLAB, from the basic syntax to practical applications, common errors, and advanced techniques.
Key Takeaways:
Introduction
Understanding the For Loop structure in MATLAB is essential for anyone looking to master this powerful programming environment. For Loops in MATLAB allow for a block of code to be executed repeatedly, making them a crucial part of automating tasks and handling iterative computations.
Syntax of For Loop in MATLAB
General Syntax Explanation
The general syntax of a For Loop in MATLAB is fairly straightforward:
for index = start:increment:end
    statements
end
Here, index is the loop variable, start is the initial value, increment is the step size, and end is the final value. The statements within the loop are executed for each value of the index from start to end, incrementing by increment at each step.
Nested For Loops Syntax
Nested For Loops are a concept where a For Loop is placed inside another For Loop, allowing for more complex iterative operations.
    for j = 1:inner_end
        statements
    end
end
In the above syntax, the inner loop will complete all its iterations for each iteration of the outer loop, allowing for operations over multi-dimensional arrays or matrices.
Table: Basic For Loop Syntax Components
| Component |
Description |
Example |
| index |
Loop variable |
i |
| start |
Initial value of the loop variable |
1 |
| increment |
Step size for the loop variable |
1 |
| end |
Final value of the loop variable |
10 |
Working of For Loop in MATLAB
Understanding the flow of control within a For Loop is essential to effectively utilize this structure in MATLAB. Here’s how MATLAB executes the loop statements:
- The loop index is initialized to the start value.
- The statements within the loop are executed.
- The loop index is incremented by the specified step size.
- Steps 2 and 3 are repeated until the loop index exceeds the end value.
Flowchart: Working of For Loop in MATLAB
| Step |
Action |
| 1 |
Initialize loop index to start value |
| 2 |
Execute loop statements |
| 3 |
Increment loop index |
| 4 |
Check if loop index exceeds end value |
| 5 |
If not, repeat steps 2-4 |
Practical Applications of For Loop in MATLAB
For Loops in MATLAB are instrumental in a myriad of practical applications:
Iterating Over Arrays and Matrices
- Through For Loops, you can easily iterate over elements in arrays and matrices, allowing for element-wise operations or computations.
Running Simulations
- For Loops are extensively used in running simulations where a particular simulation needs to be run for a specified number of iterations.
Real-world Problems
- Solving real-world problems like calculating financial forecasts, engineering simulations, and many more are streamlined with the use of For Loops in MATLAB.
Common Errors and Troubleshooting
When writing For Loops in MATLAB, it’s common to encounter errors. Here are some common mistakes and tips on troubleshooting:
- Incorrect Loop Index: Ensure the loop index is correctly specified and updated.
- Infinite Loops: Make sure the loop condition is well-defined to prevent infinite loops.
Advanced Techniques
Optimizing your For Loops in MATLAB can significantly improve your code’s performance:
Optimizing For Loop for Better Performance
- Utilizing vectorization and other MATLAB built-in functions can help enhance loop performance.
Utilizing Vectorization
- Vectorization allows for operations to be performed on entire arrays or matrices, which can significantly speed up your code when used properly.
Frequently Asked Questions (FAQs)
How can I optimize the performance of For Loops in MATLAB?
Utilizing vectorization and MATLAB built-in functions can significantly improve the performance of For Loops.
What are the common errors encountered while writing For Loops in MATLAB?
Common errors include incorrect loop index specification and infinite loops due to ill-defined loop conditions.
Java
In Java, arrays are collections of variables, known as components or elements, that hold values of the same type. These data structures contain related data items of a similar type. Once you create an array, it remains a fixed-length entity, but you can reassign a reference array to a new array with a different length.
Delving into Java’s Collections API, we find the Arrays class, which offers a set of utility methods for manipulating Java arrays. Crucially, Java arrays provide several features:
- Distinguishing between primitive types and reference types, with arrays falling under reference types as they are objects.
- Flexibility to hold elements of either reference or primitive data types.
- Unique handling compared to languages like C/C++, offering distinct functionalities.
- The capability to create arrays of any type, including those with multiple dimensions.
- Efficient access to specific array elements by specifying the array’s name and the element’s index number.
Understanding array data structures is key for tackling array-based interview questions or coding challenges.
Dynamic Arrays in Java
Furthermore, dynamic arrays in Java, such as ArrayLists, dynamically expand in size to accommodate new elements. This flexibility contrasts with the fixed size of standard arrays.
Dynamic Array Features
- They offer the ability to add or delete elements dynamically.
- They come with an automatic resizing capability.
Pros and Cons of Dynamic Arrays
- Advantages include being cache-friendly, having a variable size, and facilitating efficient looping.
- However, they have drawbacks, such as slower inserts and deletes, and slower appends compared to standard arrays.
Array vs. ArrayList
When considering an Array versus an ArrayList, it’s important to note the differences:
- Standard arrays have a fixed length, while ArrayLists offer dynamic resizing.
- Arrays can store both primitives and objects, in contrast to ArrayLists, which only store objects.
- ArrayLists provide specific methods for accessing and modifying elements, enhancing usability.
Arrays of Objects
Arrays of Objects are particularly useful for storing multiple object references in a structured way.
Creating and Instantiating Arrays of Objects
To create and instantiate such an array, you might use the following approach:
Class_Name[] arrayReference;
arrayReference = new Class_Name[ArrayLength];
For instance, creating an array of Employee objects involves:
Employee[] employeeObjects = new Employee[4];
An illustrative Java program demonstrating an array of objects is shown below:
public class Employee {
    private int id;
    private String name;
    private String dept;

    Employee(int id, String name, String dept) {
        this.id = id;
        this.name = name;
        this.dept = dept;
    }

    @Override
    public String toString() {
        return "Employee [id=" + id + ", name=" + name + ", dept=" + dept + "]";
    }
}

public class ArrayObjects {
    public static void main(String[] args) {
        Employee[] employeeObjects = new Employee[3];
        employeeObjects[0] = new Employee(1, "Sam", "CSE");
        employeeObjects[1] = new Employee(2, "John", "ECE");
        employeeObjects[2] = new Employee(3, "Mike", "IT");

        for (Employee i : employeeObjects) {
            System.out.println("Array Data is : " + i);
        }
    }
}
Concatenating Arrays
Java provides several methods to concatenate arrays. These methods include using Apache Commons Lang’s ArrayUtils and Java 8 Streams, each offering a unique approach.
Concatenating Using ArrayUtils
ArrayUtils, a part of the Apache Commons Lang library, simplifies array operations. For example, to concatenate two arrays:
import org.apache.commons.lang3.ArrayUtils;

public class ConcatenateArrays {
    public static void main(String[] args) {
        String[] first = {"a", "b", "c"};
        String[] second = {"d", "e", "f"};
        String[] result = ArrayUtils.addAll(first, second);

        System.out.println("Concatenate Results are : " + Arrays.toString(result));
    }
}
Concatenating Using Java Stream
Alternatively, Java 8’s Stream API offers a functional approach. This method is particularly useful for combining arrays of varying lengths:
import java.util.Arrays;
import java.util.stream.Stream;

public class ConcatenateStream {
    public static void main(String[] args) {
        String[] first = {"a", "b", "c"};
        String[] second = {"d", "e", "f"};
        String[] result = Stream.concat(Arrays.stream(first), Arrays.stream(second)).toArray(String[]::new);

        System.out.println("Stream Results are : " + Arrays.toString(result));
    }
}
Concatenating Using flatMap
Moreover, the flatMap method in Streams can be used for concatenation, offering a concise solution:
import java.util.stream.Stream;

public class ConcatenateFlatMap {
    public static void main(String[] args) {
        String[] first = {"a", "b", "c"};
        String[] second = {"d", "e", "f"};
        String[] result = Stream.of(first, second).flatMap(Stream::of).toArray(String[]::new);

        System.out.println("FlatMap Results are : " + Arrays.toString(result));
    }
}
Concatenating Using Generics
Lastly, using Generics combined with reflection, we can create a more versatile concatenation method that works with arrays of any type:
import java.lang.reflect.Array;
import java.util.Arrays;
import java.util.stream.Stream;

public class ConcatenateGenerics {
    public static  T[] concatenate(T[] first, T[] second) {
        return Stream.concat(Arrays.stream(first), Arrays.stream(second))
                .toArray(size -> (T[]) Array.newInstance(first.getClass().getComponentType(), size));
    }

    public static void main(String[] args) {
        String[] first = {"a", "b", "c"};
        String[] second = {"d", "e", "f"};
        String[] result = ConcatenateGenerics.concatenate(first, second);

        System.out.println("Generic Results are : " + Arrays.toString(result));
    }
}
Frequently Asked Questions (FAQs)
How do I initialize an array in Java?
Arrays in Java can be initialized during declaration, using new keyword, or using an array initializer. For example: int[] myArray = new int[10]; or int[] myArray = {1, 2, 3};
Can I change the size of an array after its creation in Java?
No, once created, the size of a Java array is fixed. However, you can create a new array with a different size and copy elements over.
What is a multidimensional array in Java?
A multidimensional array in Java is an array of arrays. Each element of a multidimensional array is itself an array. For example, int[][] matrix = new int[3][3];
How do I loop through an array in Java?
You can loop through an array in Java using a for loop, enhanced for loop, or Java 8 Streams. For example, for(int i : myArray) { System.out.println(i); }
What is the difference between an array and an ArrayList in Java?
An array is a fixed-size data structure, while ArrayList is a resizable array implementation. ArrayList provides methods for easy insertion and removal of elements.
How do I convert an ArrayList to an array in Java?
You can convert an ArrayList to an array using the toArray() method. For example, String[] array = myArrayList.toArray(new String[0]);
How can I sort an array in Java?
You can sort an array in Java using Arrays.sort(). For example, Arrays.sort(myArray); sorts the array in ascending order.
How do I find the length of an array in Java?
You can find the length of an array in Java using the length attribute. For example, int length = myArray.length;
How do I copy an array in Java?
You can copy an array in Java using Arrays.copyOf(), System.arraycopy(), or Object.clone(). For example, int[] copy = Arrays.copyOf(myArray, myArray.length);
How do I handle a null pointer exception when working with arrays in Java?
To avoid null pointer exceptions, ensure that the array or its elements are properly initialized before use. Additionally, check for null before accessing array elements.
Java
Class StringBuffer in Java: StringBuffer is a associate class of String which provides majority of functionality of strings.
As you know String for its immutable character sequences and fixed-length.
In contrast, StringBuffer speaks for its growable and writeable character sequences.
StringBuffer might have substrings and characters appended at the end or inserted in the middle.
Moreover StringBuffer will grow automatically for additions and often it has more characters preallocated than the actual need.
Both String and StringBuffer used more often in Java, but many developers most deal only with String and let Java to manipulate StringBuffer’s in background by using the overloaded + operator.
Introduction to StringBuffer
String objects are constant strings, whereas StringBuffer objects are modifiable strings.
ava distinguishes constant strings from modifiable strings for optimization purposes.
In particular, Java performs specific optimizations including String objects (like sharing one String object across multiple references) because it knows there will be no change in objects.
when given the choice between using a String object to represent a string versus a StringBuffer object to represent that string, always prefer a String object if the string will not change; this improves performance for sure.
StringBuffer Constructors
Class StringBuffer provides four types of constuctors through which it will be initialized.
Default Constructor:
StringBuffer buffer = new StringBuffer()
Above constructor is the default StringBuffer constuctor to create a StringBuffer with no characters in it and an intitial capacity of 16 characters (default for a StringBuffer).
Integer Argument Constructor:
Syntax:
StringBuffer buffer = new StringBuffer(int size);
Example:
StringBuffer buffer = new StringBuffer(20);
Above type of constuctor takes an integer argument to create a StringBuffer with no characters in it and the intitial capacity specified by the integer argument.
String Argument Constructor:
Syntax:
StringBuffer buffer = new StringBuffer(String str);
Example:
StringBuffer buffer = new StringBuffer("TracedDynamics");
Above variation of constructor takes a String argument (i.e, in this example case a string literal) to create a StringBuffer containing the characters in the String argument.
The inital capacity is the number of charcters in the string argument plus 16.
CharacterSequence Argument Constructor:
Syntax:
StringBuffer buffer = new StringBuffer(CharSequence chars);
Above constructor creates an object that contains the character sequence contained in chars.
You May Also Like,
StringBuffer Methods
Following are the different methods provided by the StringBuffer.
length()
The current length of a StringBuffer can be found via using the length() method.
public class Main {
  public static void main(String[] args) {

   try {
	StringBuffer buffer = new StringBuffer("TraceDynamics");
	System.out.println("StringBuffer Length: "+buffer.length());
  } catch (Exception e) {
	 e.printStackTrace();
  }
 }
}

Output:
StringBuffer Length: 13
capacity()
This method provides the total allocated capacity through the capacity() method.
public class Main {
  public static void main(String[] args) {

  try {
   StringBuffer buffer = new StringBuffer("TraceDynamics");
   System.out.println("StringBuffer Capacity: "+buffer.capacity());
  } catch (Exception e) {
	e.printStackTrace();
  }
 }
}
Output:
StringBuffer Capacity: 29
So whats the logic behind capacity output value of 29 in above program ? Since StringBuffer by default allocates space for 16 additional characters, total length of input string plus 16 will be the capacity.
In this the input string length is 13 and StringBuffer default allcoation is 16, so 13+16 = 29 is the capacity.
ensureCapacity()
If you are looking to preallocate space for a specific number of characters after a StringBuffer has been constructed, we can use ensureCapacity() method to set the size of the buffer.
This way of implementation is useful if you know in prior that you will be appending a huge number of small strings to a StringBuffer.
Syntax:
ensureCapacity(int capacity)
public class Main {
	public static void main(String[] args) {

	try {
	 StringBuffer buffer = new StringBuffer();
	 System.out.println("Before Setting ensureCapacity : " +buffer.capacity());
	 buffer.ensureCapacity(20);
	 System.out.println("After Setting ensureCapacity : " +buffer.capacity());
   } catch (Exception e) {
	  e.printStackTrace();
   }
 }
}

Output:
Before Setting ensureCapacity : 16
After Setting ensureCapacity : 34
setLength()
Using setLength() method, we can set the length of the string within a StringBuffer object.
Syntax:
setLength(int length)
Note that, the length value should be non negative.
When you increase the size of a string, the null characters are added to the end. If you call setLength() with a value less than the current valu returned by length() method, then the characters stored above the new length will be lost.
public class Main {
	public static void main(String[] args) {

	try {
	 StringBuffer buffer = new StringBuffer("TraceDynamics");
	 System.out.println("Before Setting Length : " +buffer.length());
	 buffer.setLength(20);
	 System.out.println("After Setting Length : " +buffer.length());
   } catch (Exception e) {
	  e.printStackTrace();
   }
 }
}

Output:
Before Setting ensureCapacity : 16
After Setting ensureCapacity : 34
charAt()
Using charAt() method, we can obtain the value of a single character from a StringBuffer.
Syntax:
charAt(int index).
Note that, the index value should be non negative.
public class Main {
	public static void main(String[] args) {

	try {
	 StringBuffer buffer = new StringBuffer("TraceDynamics");
	 System.out.println("Char at: " +buffer.charAt(2));
   } catch (Exception e) {
	  e.printStackTrace();
   }
 }
}

Output:
Char at: a
setCharAt()
Using setCharAt() method, we can set the value of a character from a StringBuffer.
Syntax:
setCharAt(int index, char ch)
Note that, the index value should be non negative.
public class Main {
	public static void main(String[] args) {

	try {
	 StringBuffer buffer = new StringBuffer("TraceDynamics");
	 buffer.setCharAt(2, '$');
	 System.out.println("Set Char at: "+buffer);
   } catch (Exception e) {
	  e.printStackTrace();
   }
 }
}

Output:
Set Char at: Tr$ceDynamics
getChars()
Using getChars() method, we can copy a substring of a StringBuffer into array.
Syntax:
getChars(int startIndex, int endIndex, char target[], int targetStartIndex)
Here the startIndex specifies the index of the beginning of the substring, and endIndex specifies a index that is one past the end of desired substring.
This means that the substring contains the characters from startIndex through endIndex-1. The array that wil receive the characters is specified by target.
The index within target at which the substring will be copied is passed in targetStartIndex.
We have to assure that the target[] is big enough to hold the number of characters in the specified substring.
public class Main {
	public static void main(String[] args) {

	try {
	 StringBuffer buffer = new StringBuffer("Trace Dynamics");
	 char[] array = new char[] { 'w', 'e', 'l', 'c', 'o', 'm', 'e' };
	 buffer.getChars(6, 9, array, 3);
	 System.out.println(array);
   } catch (Exception e) {
	  e.printStackTrace();
   }
 }
}

Output:
welDyne
append()
Basically the method append() concatenates the representation string of any other type of data to the end of the triggering StringBuffer object.
Inorder to obtain string representation for each parameter, String.valueOf() method is called.
Also append() method has numerous overload versions, here are they.
- append(String str)
- append(boolean b)
- append(int i)
- append(Object obj)
- append(char c)
- append(char[] str)
- append(CharSequence s)
- append(float f)
- append(double d)
- append(long lng)
- append(StringBuffer sb)
- append(CharSequence s, int start, int end)
- append(char[] str, int offset, int len)
public class Main {
	public static void main(String[] args) {

	try {
	 StringBuffer buffer = new StringBuffer("Trace Dynamics");
	 System.out.println("before inserting: " + buffer);
	 buffer.insert(14, " Welcomes You");
	 System.out.println("After inserting: " + buffer);
   } catch (Exception e) {
	  e.printStackTrace();
   }
 }
}

Output:
before appending: TraceDynamics
After appending: TraceDynamics Welcomes You
insert()
The method insert() inserts one string into another.
This method is overloaded to accept the values of all the types, Objects, Strings and CharSequences.
Likewise append() method, insert() also String.valueOf() to obtain the string representation of the value it is called with.
String.valueOf() method called to obtain a string representation for each parameter.
Here are the different forms of insert() methods.
- insert(int index, String str)
- insert(int index, char ch)
- insert(int index, Object obj)
In above, index specifies at which point the string will be inserted into the invoking StringBuffer object.
public class Main {
	public static void main(String[] args) {

	try {
	 StringBuffer buffer = new StringBuffer("Trace Dynamics");
	 System.out.println("before inserting: " + buffer);
	 buffer.insert(14, " Welcomes You");
	 System.out.println("After inserting: " + buffer);
   } catch (Exception e) {
	  e.printStackTrace();
   }
 }
}

Output:
before inserting: Trace Dynamics
After inserting: Trace Dynamics Welcomes You
reverse()
The method reverse() is used to reverse the characters with in a StringBuffer object.
Syntax:
reverse()
public class Main {
	public static void main(String[] args) {

	try {
	 StringBuffer buffer = new StringBuffer("TraceDynamics");
	 System.out.println("StringBuffer Reverse: " + buffer.reverse());
   } catch (Exception e) {
	  e.printStackTrace();
   }
 }
}

Output:
StringBuffer Reverse: scimanyDecarT
delete()
The method delete() is used to delete the characters with in a StringBuffer object.
Syntax:
delete(int indexStart, String indexEnd)
public class Main {
	public static void main(String[] args) {

	try {
	 StringBuffer buffer = new StringBuffer("TraceDynamics");
	 System.out.println("StringBuffer Delete: " + buffer.delete(0,5));
   } catch (Exception e) {
	  e.printStackTrace();
   }
 }
}

Output:
StringBuffer Delete: Dynamics
deleteCharAt()
The method delete() is used to delete the characters at a specified index.
Syntax:
deleteCharAt(int index)
public class Main {
	public static void main(String[] args) {

	try {
	 StringBuffer buffer = new StringBuffer("TraceDynamics");
	 System.out.println("StringBuffer DeletCharAt: " + buffer.deleteCharAt(0));
   } catch (Exception e) {
	  e.printStackTrace();
   }
 }
}

Output:
StringBuffer Delete: Dynamics
replace()
The method replace() is used to replace the characters at a specified index.
Syntax:
replace(int indexStart, String indexEnd, String str)
public class Main {
	public static void main(String[] args) {

	try {
	 StringBuffer buffer = new StringBuffer("TraceDynamics");
	 System.out.println("StringBuffer Delete: " + buffer.replace(0,5,"Test"));
   } catch (Exception e) {
	  e.printStackTrace();
   }
 }
}

Output:
StringBuffer Delete: TestDynamics
substring()
The method substring() is used to retrieve a portion of a string at a specified index.
Syntax:
substring(int indexStart)
substring(int indexStart, String indexEnd)
The second syntax above returns the substring which starts at indexStart and process through indexEnd-1.
Here is the code example which utilizes second syntax above.
public class Main {
	public static void main(String[] args) {

	try {
	 StringBuffer buffer = new StringBuffer("TraceDynamics");
	 System.out.println("StringBuffer substring: " + buffer.substring(0,5));
   } catch (Exception e) {
	  e.printStackTrace();
   }
 }
}

Output:
StringBuffer substring: Trace
Why StringBuffer is Mutable?
As per builtin behaviour String class in Java is Immutable, which means whenever we declare a String variable we cannot modify the data or perform any manipulations.
For some specific instances we might have to modify the data of a String, for such scenarios we can leverage StringBuffer which is mutable(modifiable) by nature.
substring(int indexStart)
substring(int indexStart, String indexEnd)
Convert StringBuffer to String
Converting StringBuffer to String is a straight forward task, we just have to leverage toString() method.
Applying toString() method on StringBuffer object will serve the purpose.
Here is the example.
public class Main {
	public static void main(String[] args) {

	try {
	 StringBuffer buffer = new StringBuffer("TraceDynamics");
	 String output = buffer.toString();
	 System.out.println("StringBuffer to String: " +output);
   } catch (Exception e) {
	  e.printStackTrace();
   }
 }
}

Output:
StringBuffer to String: TraceDynamics
Note:
In JDK 1.5 version, Java introduced StringBuilder for handling string capabilities.
This is very much similar to StringBuffer apart from one one important difference, StringBuilder is not synchorized(not thread safe).
Faster Performance is great advantage of StringBuilder.
To conclude this java tutorial, we covered various constructors, methods of class StringBuffer in Java.
Frequently Asked Questions
What is StringBuffer in Java?
StringBuffer is a mutable sequence of characters used for creating and manipulating string data efficiently.
How does StringBuffer differ from String in Java?
Unlike String, which is immutable, StringBuffer allows modification of its contents without creating new instances.
When should I use StringBuffer over StringBuilder?
Use StringBuffer when thread safety is required, as it is synchronized, unlike StringBuilder.
Can StringBuffer be converted to a String?
Yes, using the toString() method of StringBuffer converts it to a String.
How do you append data to a StringBuffer?
Use the append() method to add data at the end of the StringBuffer.
Is StringBuffer efficient for concatenating strings in a loop?
Yes, it’s more efficient than using + operator with Strings, especially in loops.
How can I insert a string into a StringBuffer?
Use the insert() method to add a string at a specified index in the StringBuffer.
Can I reverse a string using StringBuffer?
Yes, the reverse() method in StringBuffer reverses the sequence of characters.
What methods are used to delete or remove characters in StringBuffer?
Use delete() or deleteCharAt() methods to remove characters or a sequence of characters.
How do I ensure the capacity of a StringBuffer?
Use ensureCapacity() to ensure that the buffer has at least a specified minimum capacity.